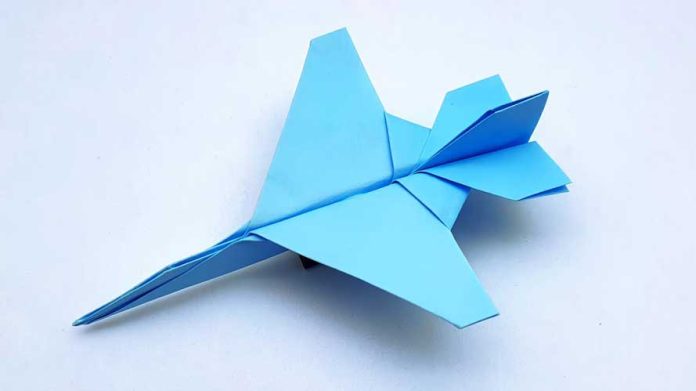
Are you fascinated by the sleek and powerful design of jet fighters? Why not try your hand at creating your own miniature version using origami! In this step-by-step guide, we’ll show you how to make an origami jet fighter. This project is perfect for beginners and origami enthusiasts alike, providing a fun and creative way to craft a dynamic paper model. Let’s get started!
Materials Needed:
- A square sheet of origami paper (preferably 6×6 inches or larger)
Step 1: Prepare Your Paper
Start with a square sheet of origami paper. If you’re using regular paper, fold one corner diagonally to the opposite corner to create a triangle and then cut off the excess to make a square.
Step 2: Fold the Paper Diagonally
Fold the paper diagonally in half to form a triangle. Crease the fold well and then unfold it.
Step 3: Fold Diagonally the Other Way
Now, fold the paper diagonally in the opposite direction to form another triangle. Crease the fold well and then unfold the paper. You should now have two diagonal creases that intersect in the middle.
Step 4: Fold the Paper in Half Horizontally
Fold the paper in half horizontally by bringing the top edge down to meet the bottom edge. Crease the fold well and then unfold the paper.
Step 5: Create a Waterbomb Base
Lift the paper at the horizontal crease you made in Step 4. Push the diagonal creases inward to collapse the paper into a smaller square (this is called a waterbomb base).
Step 6: Fold the Top Corners to the Center
With the open end of the square facing you, fold the top left and right corners of the top layer down to meet the center crease. You should now have a diamond shape with two flaps on top.
Step 7: Fold the Top Edges to the Center
Take the top left and right edges of the diamond and fold them to the center crease, creating a kite shape. Crease the folds well.
Step 8: Fold the Top Point Down
Fold the top point of the kite shape down to the bottom point of the kite, creasing well. Then unfold this fold to return to the kite shape.
Step 9: Create the Jet Fighter Wings
Unfold the paper slightly so you can see the inner layers. Fold the top left and right edges outward along the existing creases, creating the jet fighter wings. Flatten the paper well.
Step 10: Fold the Wings Down
Fold the top wings down along the horizontal crease you created earlier. Make sure the wings are well creased and symmetrical.
Step 11: Shape the Jet Fighter
Fold the top point of the jet fighter down along the existing crease. Then, fold the jet fighter in half vertically along the center crease, with the wings on the outside.
Step 12: Final Adjustments
Make final adjustments to the jet fighter to ensure it is symmetrical and the wings are properly aligned. Flatten any creases and ensure the jet fighter holds its shape.
Step 13: Display Your Origami Jet Fighter
Your DIY origami jet fighter is now complete! Display it proudly or use it as a fun decoration on your desk or shelf. You can also make multiple jet fighters in different colors for a dynamic origami fleet.
Step 14: Enjoy Your Creation
Take a moment to admire your origami jet fighter. Enjoy the satisfaction of having created a sleek and stylish paper model. Whether you’re a beginner or an experienced origami enthusiast, this jet fighter is sure to impress.
Conclusion:
Creating an origami jet fighter is a fun and engaging project that allows you to explore the art of paper folding while crafting a dynamic model. With just a square sheet of paper and a few simple folds, you can create a miniature jet fighter that’s perfect for display or play. So gather your paper and get ready to take flight with your very own origami jet fighter!


