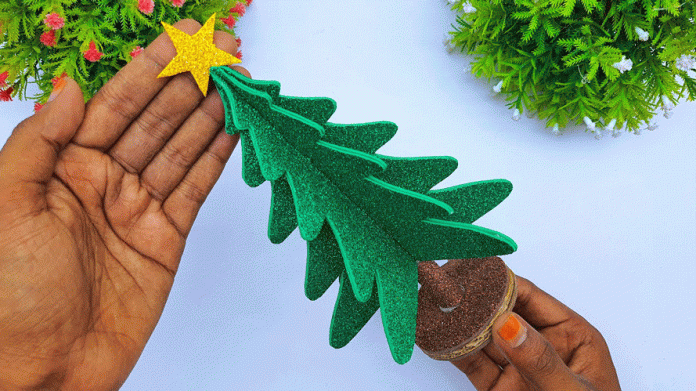
Creating your own Christmas decorations is a wonderful way to add a personal touch to your holiday decor. In this guide, we’ll show you how to make a Foamiran Christmas tree that’s both simple to create and stunning to display. Foamiran is a versatile material that’s easy to work with, making it perfect for crafting this festive project. Let’s get started!
Materials You’ll Need:
- Green Foamiran sheets
- Scissors
- Glue gun and glue sticks
- Wooden dowel or skewer (for the tree trunk)
- Small pot, vase, or decorative base
- Florist’s foam or Styrofoam (to secure the tree)
- Optional: paint, glitter, or small ornaments for decoration
- Pencil and ruler (for measuring and tracing)
- Craft knife (for intricate cuts)
Step 1: Gather Your Materials
Before you begin, gather all your materials. Green Foamiran sheets will serve as the “leaves” of your tree, and the wooden dowel or skewer will be used for the trunk. Choose a decorative base to display your tree, and gather any additional decorations you’d like to add.
Step 2: Prepare the Tree Trunk
Start by preparing the tree trunk. If you’re using a wooden dowel or skewer, cut it to the desired height for your tree. Insert the dowel into a piece of florist’s foam or Styrofoam that fits snugly inside your decorative base. This will hold the trunk in place and provide a sturdy foundation for your Foamiran tree.
Step 3: Cut Out Foamiran Leaf Layers
Measure and cut out several circles from the green Foamiran sheets. The size of these circles will determine the size of your tree, so start with larger circles at the base and gradually decrease the size as you move up the tree. You’ll need multiple layers to give the tree a full and lush appearance.
Step 4: Shape the Foamiran Leaves
To give your Foamiran leaves a more realistic look, gently warm each circle with your hands or a low-heat iron. This will make the Foamiran more pliable, allowing you to slightly curve the edges of each circle. If desired, you can cut small slits around the edges of the circles to create a more textured leaf effect.
Step 5: Assemble the Tree Layers
Starting with the largest Foamiran circle, poke a hole in the center of each circle and slide it down the wooden dowel. Apply a small amount of glue to secure each layer in place. Continue adding layers, working your way up to the smallest circles at the top. This will create a tiered effect, giving the appearance of a full, conical Christmas tree.
Step 6: Add a Tree Topper (Optional)
If you’d like to add a tree topper, such as a star or small ornament, glue it to the top of the wooden dowel. You can also use a small piece of Foamiran to create your own custom tree topper.
Step 7: Decorate the Tree
Now that your Foamiran Christmas tree is assembled, it’s time to decorate! Use small ornaments, beads, or glitter to add some festive flair. You can glue these decorations directly onto the Foamiran leaves, or simply drape them over the tree for a more natural look. If you’re using paint, add any additional details before applying the decorations.
Step 8: Final Touches
Inspect your Foamiran Christmas tree for any final adjustments. Make sure all the layers are securely attached and that the tree looks balanced and full. If needed, add a little extra glue to hold any loose pieces in place.
Step 9: Display Your Foamiran Christmas Tree
Your Foamiran Christmas tree is now complete! Place it in your chosen decorative base and display it in your home as a unique and charming piece of holiday decor. Whether it’s on your mantel, as a table centerpiece, or as part of a festive display, this handmade tree is sure to bring holiday cheer.
Additional Tips:
- Experiment with different colors of Foamiran to create a more whimsical tree.
- Add lights to your tree by carefully wrapping a small string of battery-operated fairy lights around it.
- Create a forest of Foamiran trees in different sizes for a festive scene.
Making a Foamiran Christmas tree is a delightful way to embrace the holiday spirit and add a personal touch to your decorations. With this step-by-step guide, you’ll be able to create a beautiful and festive tree that’s perfect for the season. Happy crafting and happy holidays!


