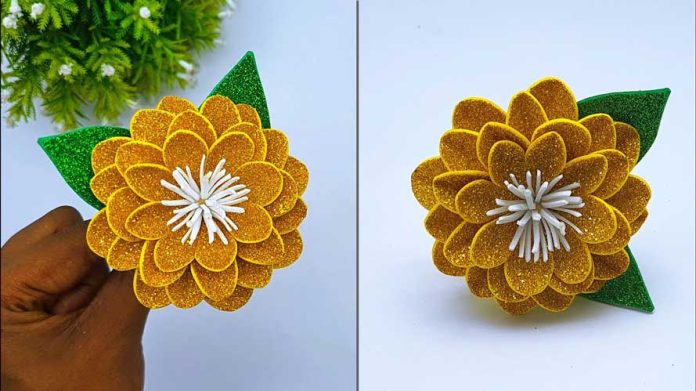
Looking to add a touch of elegance and charm to your home decor or crafting projects? Discover the art of DIY beautiful Foamiran flowers making! Foamiran, a versatile and flexible material, is perfect for creating lifelike and stunning flowers. In this step-by-step guide, we’ll walk you through the process of making your own beautiful Foamiran flowers. Let’s dive into this creative and rewarding craft!
Materials You’ll Need:
- Foamiran sheets in various colors
- Scissors
- Iron (for shaping petals)
- Hot glue gun and glue sticks
- Floral wire
- Floral tape
- Pastels or oil paints (for adding color and shading)
- Ball tools and foam pad (for shaping petals)
- Flower templates (optional)
Step 1: Gather Your Materials
Ensure you have all the necessary materials before starting. Choose Foamiran sheets in your desired flower colors and gather the tools and supplies listed above.
Step 2: Prepare Your Petal Templates
If you’re using flower templates, print and cut them out. These templates will help you achieve uniform petal shapes. You can also draw your own petal shapes on a piece of paper and cut them out as templates.
Step 3: Cut the Foamiran Petals
Place the petal templates on the Foamiran sheets and trace around them using a pencil. Cut out the petal shapes carefully with scissors. Depending on the flower you’re making, you may need several petals of varying sizes.
Step 4: Shape the Petals with Heat
Turn on your iron to a low heat setting. Place a Foamiran petal on the iron for a few seconds until it becomes soft and pliable. Quickly remove the petal and shape it with your fingers, creating natural curves and bends. Repeat this process for all the petals.
Step 5: Add Color and Shading
Use pastels or oil paints to add color and shading to the petals. Lightly brush the edges and centers of the petals to create a more realistic look. Blend the colors gently for a smooth gradient effect.
Step 6: Assemble the Flower
Start by creating the flower center. Take a small piece of Foamiran, roll it into a ball, and glue it onto the end of a floral wire. Next, begin attaching the petals around the center. Apply a small amount of hot glue to the base of each petal and press it onto the flower center, layering the petals as you go.
Step 7: Secure the Petals
Once all the petals are attached, use floral tape to wrap around the base of the flower and the floral wire, securing the petals in place. This will also give the flower a finished and polished look.
Step 8: Shape and Adjust the Flower
Carefully shape and adjust the petals to ensure the flower looks natural and lifelike. Gently curl the edges and arrange the petals for a realistic appearance.
Step 9: Create Leaves (Optional)
To add leaves to your Foamiran flower, cut leaf shapes from green Foamiran sheets. Use the same heating and shaping technique to add curves and texture to the leaves. Attach the leaves to the floral wire using hot glue and secure them with floral tape.
Step 10: Final Touches
Inspect your Foamiran flower and make any final adjustments. Ensure all petals and leaves are securely attached and shaped to your liking. Your beautiful Foamiran flower is now complete!
Additional Tips:
- Experiment with different flower types by using various petal shapes and sizes.
- Practice shaping the Foamiran petals with heat to achieve the desired look.
- Combine different colors and shading techniques for a more vibrant and realistic flower.
Creating Foamiran flowers is a delightful and rewarding craft that allows you to design stunning and lifelike floral arrangements. By following this guide on DIY beautiful Foamiran flowers making, you’ll be able to craft your own exquisite flowers that can be used for home decor, gifts, or special occasions. Happy crafting!


