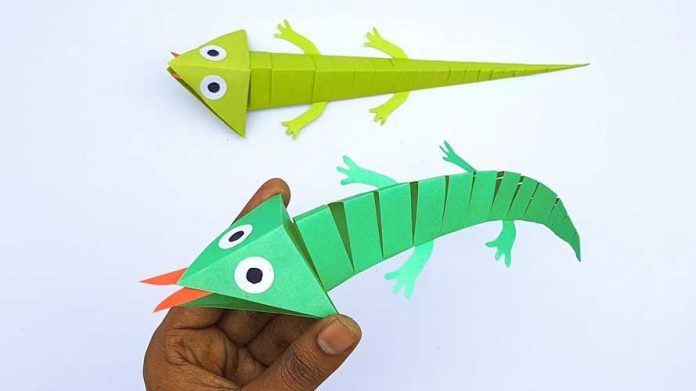
Origami and paper crafts have been around for centuries, providing entertainment and creative outlet for people of all ages. One popular papercraft is the DIY moving paper toy chameleon. This cute and colorful toy can be created with just a few simple steps and is a great way to entertain kids and adults alike. In this article, we will provide a step-by-step guide on how to create your very own DIY moving paper toy chameleon.
Materials Required:
To create your DIY moving paper toy chameleon, you will need the following materials:
- Colored paper (green, yellow, and red)
- Scissors
- Glue
- Markers (optional)
Step-by-Step Guide:
Step 1: Start by cutting a rectangular piece of green paper, roughly 5 inches by 8 inches in size.
Step 2: Fold the green paper in half lengthwise, creasing the fold well.
Step 3: Unfold the paper and fold it in half widthwise, creasing the fold well.
Step 4: Open the paper back up to its full size. You should now see four creases in the paper.
Step 5: Cut along the creases on each end of the paper, creating four tabs.
Step 6: Fold the tabs inwards, towards the center of the paper. Crease the folds well.
Step 7: Cut out a small tongue shape from the red paper.
Step 8: Glue the tongue to the bottom edge of the green paper.
Step 9: Cut out two small circles from the yellow paper. These will be the eyes of the chameleon.
Step 10: Draw pupils on the yellow circles using a marker (optional).
Step 11: Glue the eyes to the top of the green paper, near the top edge.
Step 12: Cut out four small triangles from the red paper. These will be the chameleon’s feet.
Step 13: Fold the triangles in half, creating a crease along the center.
Step 14: Glue two feet to each end of the green paper, near the bottom edge.
Step 15: Your DIY moving paper toy chameleon is now complete! To make it move, gently pull the tongue down and watch as the legs move back and forth.
Tips and Tricks:
- To make the toy more colorful, try using different shades of green or adding patterns to the paper.
- You can experiment with different shapes and sizes of the tabs to create different movements for the toy.
- Try making multiple chameleons in different colors to create a fun collection.
- If you don’t have colored paper, try decorating white paper with markers or crayons before folding it.
Creating your own DIY moving paper toy chameleon is a fun and easy project that can be enjoyed by people of all ages. With just a few simple steps, you can create a cute and colorful toy that will entertain and delight you. So gather your materials and get started on your own paper chameleon today!
Here are some additional tips and tricks to help you make the most out of your DIY moving paper toy chameleon:
- If you want to make your chameleon more sturdy, consider using cardstock paper instead of regular paper. This will give your chameleon more durability and make it last longer.
- Experiment with different colors and patterns to make your chameleon more unique. You can even add designs to the eyes or the body of the chameleon to make it look more interesting.
- If you want to make your chameleon even more lifelike, consider using googly eyes instead of drawing them. This will give your chameleon a more three-dimensional look and make it more fun to play with.
- If you have younger kids, you can simplify the steps by cutting out the tabs for them in advance. This will make it easier for them to assemble the chameleon and get started with the fun part – making it move!
- Once you’ve mastered making a chameleon, you can experiment with creating other animals or objects that move. For example, you could create a paper crane that flaps its wings or a paper windmill that spins in the breeze.
- If you’re looking for a fun activity to do with a group of kids, consider hosting a paper toy-making party. You can provide the materials and instructions, and let the kids get creative and make their own unique paper toys to take home.
Making a DIY moving paper toy chameleon is a great way to exercise your creativity and have fun at the same time. By following the step-by-step guide and experimenting with different colors and patterns, you can create a toy that is unique and entertaining. So grab your scissors and paper, and let your imagination run wild!


