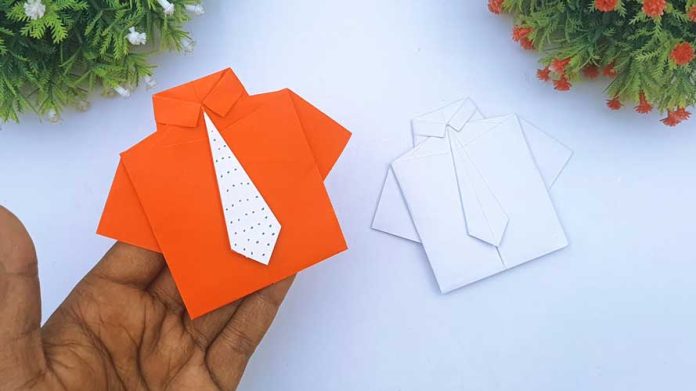
Creating an origami shirt with a tie is a fun and impressive way to add a personal touch to your greeting cards, gifts, or decorations. This simple yet elegant paper craft is perfect for occasions like Father’s Day, birthdays, or even as a creative thank-you card. In this step-by-step guide, we’ll show you how to fold an origami shirt with a tie, ensuring your final product looks polished and professional.
Materials Needed:
- A square sheet of paper (preferably origami paper, but any square sheet will work)
- A contrasting strip of paper for the tie (optional)
- Scissors (if you need to cut the paper to size)
- A flat, clean surface to work on
Step 1: Prepare Your Paper
Before you begin, make sure you have a square piece of paper. If you’re using a rectangular sheet, you’ll need to cut it into a square:
- Measure and Cut:
- Fold one corner of the paper diagonally to the opposite edge to form a triangle.
- Cut off the excess rectangle, leaving you with a perfect square when you unfold the triangle.
- Choose Your Paper:
- Select paper with a different color or pattern on each side for a more dynamic look.
Step 2: Fold the Paper in Half
- Fold Vertically:
- Lay the paper flat with the colored side facing down.
- Fold the square in half vertically, creasing well, then unfold it to leave a center crease.
- Fold Horizontally:
- Fold the square in half horizontally, creasing well, then unfold it. Now you have a cross crease.
Step 3: Fold the Edges to the Center
- Vertical Folds:
- Take the left edge of the paper and fold it to align with the center crease. Crease well.
- Repeat with the right edge, folding it to meet the center crease.
- Horizontal Folds:
- Fold the top edge down to meet the center crease. Crease well.
- Repeat with the bottom edge, folding it up to meet the center crease.
Step 4: Create the Collar
- Fold Down the Top:
- Fold down the top edge about 1/4 of the way from the top to create a horizontal crease.
- Create the Collar:
- Fold the top corners diagonally towards the center crease, aligning the points with the edge of the top fold. This will form the collar of the shirt.
Step 5: Shape the Shirt Body
- Fold Up the Bottom:
- Fold the bottom edge of the paper upwards, tucking it under the collar. The folded edge should meet the bottom of the collar.
- Smooth and Crease:
- Adjust the fold to ensure the shirt looks even and the collar is well-defined.
Step 6: Create the Tie (Optional)
- Prepare the Tie Paper:
- Cut a small strip of contrasting paper for the tie. The strip should be about 1/4 the width of the shirt and slightly longer than the shirt’s height.
- Fold the Tie:
- Fold the strip in half lengthwise, then fold the top corners inwards to meet the center crease, forming a point.
- Attach the Tie:
- Slide the tie under the collar and adjust it to your liking. Secure it with a tiny dab of glue if necessary.
Step 7: Final Adjustments
- Smooth Folds:
- Ensure all creases are smooth and sharp for a crisp, clean look.
- Customize:
- Add additional decorations, such as buttons drawn with a marker or small stickers.
Conclusion
Folding an origami shirt with a tie is a delightful way to show your creativity and add a personal touch to your projects. This simple yet elegant craft is perfect for various occasions and is sure to impress. By following this How To Fold Origami Shirt With Tie guide, you can create a stylish and unique paper shirt that’s perfect for any occasion.
Gather your materials and start folding your origami shirt with a tie today. Happy crafting!


