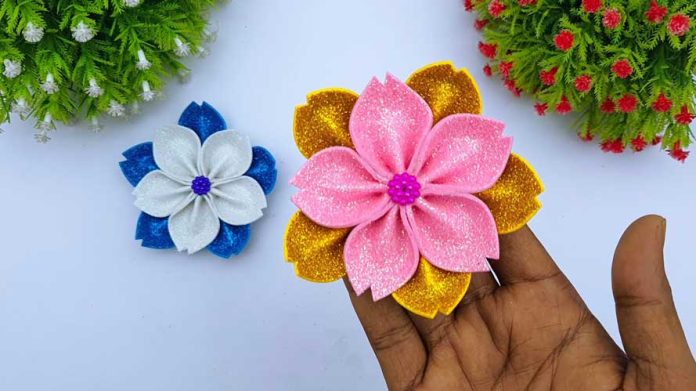
Flowers bring an instant burst of color and joy to any occasion. Imagine capturing that essence in a unique and dazzling way with glitter foam sheet flowers. These eye-catching creations are not only fun to make but also perfect for adding a touch of sparkle to your home decor, gifts, or special events. In this comprehensive guide, we will walk you through the step-by-step process of crafting your own stunning glitter foam sheet flowers. So, gather your supplies, unleash your creativity, and let’s get started!
Step 1: Gather the Supplies Before diving into the crafting process, it’s important to gather all the necessary supplies. Here’s what you’ll need:
- Glitter foam sheets in various colors
- Flower templates or stencils
- Scissors
- Pencil
- Craft glue or adhesive dots
- Floral wire or pipe cleaners
- Wire cutters
- Embellishments (optional)
Step 2: Choose Your Flower Design Select the flower design you want to create. You can find pre-made templates online or create your own. Draw the design on the glitter foam sheets using a pencil. Ensure that the size and shape of the petals are consistent for a harmonious final result.
Step 3: Cut Out the Petals Using sharp scissors, carefully cut out the foam sheet petals following the outlines you drew. Take your time and make precise cuts to achieve clean edges. Repeat this step for each petal required for your chosen flower design.
Step 4: Assemble the Flower Lay out the foam petals in the desired arrangement, experimenting with different color combinations to create a visually appealing flower. Once you are satisfied with the layout, start attaching the petals together using craft glue or adhesive dots. Apply a small amount of glue to the base of each petal and press them firmly together, ensuring they overlap slightly.
Step 5: Create the Flower Center To add depth and interest to your glitter foam sheet flower, craft a center using a different color foam sheet or other embellishments. Cut out small shapes, such as circles or stars, and attach them to the center of the flower using glue or adhesive dots. Alternatively, you can use small beads, rhinestones, or buttons to create an eye-catching focal point.
Step 6: Attach the Stem To give your flower stability and allow for various display options, attach a stem using floral wire or pipe cleaners. Cut a piece of wire to your desired length and bend it in half to create a loop at one end. Apply glue or adhesive dots to the back of the flower base and insert the looped end of the wire, securing it firmly.
Step 7: Finishing Touches Inspect your glitter foam sheet flower to ensure all parts are securely attached. Trim any excess wire using wire cutters if necessary. Take a moment to fluff and adjust the petals, ensuring they are arranged to your liking. You can also add additional embellishments, such as glitter, sequins, or ribbon, for an extra touch of glamour.
Step 8: Display and Enjoy! Your beautiful glitter foam sheet flower is now complete! Place it in a vase, attach it to a gift, or use it as a decorative element in various craft projects. Let your creativity shine as you explore different color combinations and flower designs. With practice, you’ll master this art and create a stunning collection of glitter foam sheet flowers that will impress everyone.
Conclusion:
Crafting glitter foam sheet flowers is a delightful way to express your creativity and add a touch of sparkle to any occasion. By following this step-by-step guide, you’ve learned the essential techniques needed to create stunning foam sheet flowers.


