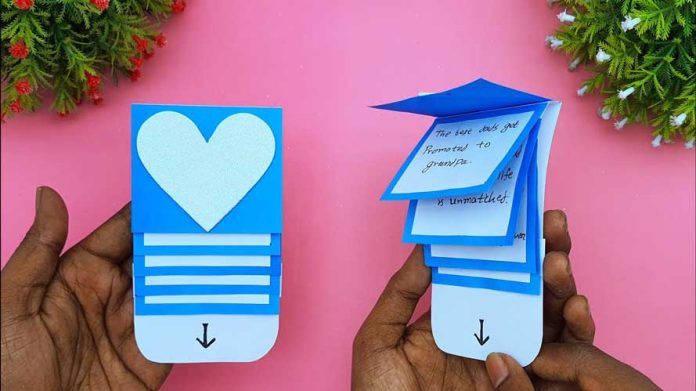
Father’s Day is a special time to celebrate and honor the amazing dads in our lives. This year, why not surprise your dad with a unique and creative gift? In this step-by-step guide, we’ll show you how to make a waterfall gift card for Father’s Day, a delightful handmade greetings card that is sure to impress. This interactive card will convey your love and appreciation in a memorable way.
Materials Needed:
- Cardstock in various colors
- Patterned paper
- Scissors
- Ruler
- Pencil
- Double-sided tape or glue
- Ribbon
- Markers or pens
- Embellishments (stickers, stamps, etc.)
- Craft knife (optional)
Step 1: Gather Your Materials
Ensure you have all the necessary materials before you begin. Choose cardstock and patterned paper that complement each other and suit your dad’s style.
Step 2: Create the Card Base
- Cut a piece of cardstock to measure 6 inches by 12 inches.
- Fold it in half to create a 6×6 inch card base.
Step 3: Prepare the Waterfall Mechanism
- Cut a strip of cardstock to measure 2 inches by 9 inches. This will be the main strip for the waterfall mechanism.
- Score the strip at 2 inches, 2 3/4 inches, 3 1/2 inches, and 4 1/4 inches. These scores will help the strip fold easily to create the waterfall effect.
Step 4: Cut and Decorate the Panels
- Cut four pieces of cardstock, each measuring 2 inches by 2 inches. These will be the panels that flip as the waterfall mechanism is pulled.
- Decorate each panel with patterned paper, stickers, or drawings. You can add small photos, messages, or anything your dad would love.
Step 5: Attach the Panels to the Waterfall Mechanism
- Fold along the scored lines of the waterfall strip.
- Apply double-sided tape or glue to the top section (above the first score line) of the waterfall strip.
- Attach one of the decorated panels to this section.
- Repeat this process for the remaining panels, attaching each one to the next section created by the score lines.
Step 6: Create the Pull Tab
- Cut a small strip of cardstock, approximately 3/4 inch by 3 inches.
- Attach this strip to the bottom end of the waterfall strip to create a pull tab.
- Decorate the pull tab with a message such as “Pull” or add a small ribbon loop for easier pulling.
Step 7: Attach the Waterfall Mechanism to the Card Base
- Cut a piece of cardstock to measure 1 inch by 6 inches. This will be the anchor strip for the waterfall mechanism.
- Attach the anchor strip horizontally to the front of the card base, about 1 inch from the top.
- Slide the waterfall strip under the anchor strip, positioning it so the pull tab hangs below the anchor strip.
- Secure the sides of the anchor strip with double-sided tape or glue, ensuring the waterfall strip can still slide freely.
Step 8: Decorate the Card Base
- Add decorations to the front of the card base around the waterfall mechanism. You can use markers, stickers, stamps, or patterned paper to create a personalized design.
- Write a heartfelt message on the inside of the card to let your dad know how much he means to you.
Step 9: Test the Waterfall Mechanism
Gently pull the tab to ensure the panels flip smoothly and the waterfall effect works properly. Make any necessary adjustments to ensure everything is secure and functional.
Step 10: Add Final Touches
Finish decorating the card with any additional embellishments you like. You can add buttons, sequins, or even small charms to make the card extra special.
Conclusion:
Making a waterfall gift card for Father’s Day is a wonderful way to show your dad how much you care. This handmade Father’s Day greetings card is not only beautiful but also interactive and fun. Your dad will surely appreciate the effort and creativity you put into making such a unique and heartfelt gift. So gather your materials and start crafting this delightful card today. Happy Father’s Day crafting!


